Switching from a 6-volt to a 12-volt system in a tractor may initially appear challenging, but it becomes a straightforward task with a clear understanding of the wiring and procedure. This comprehensive guide provides a step-by-step walkthrough of the conversion process, ensuring safety and efficiency.
| Component | Description |
|---|---|
| Alternator | This will provide the power for your new 12-volt system. |
| Battery | This will store the energy from the alternator. |
| Fuses | These will protect your electrical system from damage. |
| Wires | These will be used to connect the new components to your vehicle. |
Development to 6 Volt to 12 Volt Conversion Wiring Diagram

The following steps will show you how to convert your car to 12 volts:
- Remove the old 6-volt battery.
- Install the new 12-volt battery.
- Connect the new alternator to the battery.
- Connect the new fuses to the alternator.
- Connect the new wires to the alternator and the other components in your vehicle.
Here is a list of some of the benefits of converting to a 12-volt system:
- Improved performance
- Increased reliability
- Ability to use modern accessories
1. Understanding the Conversion Process
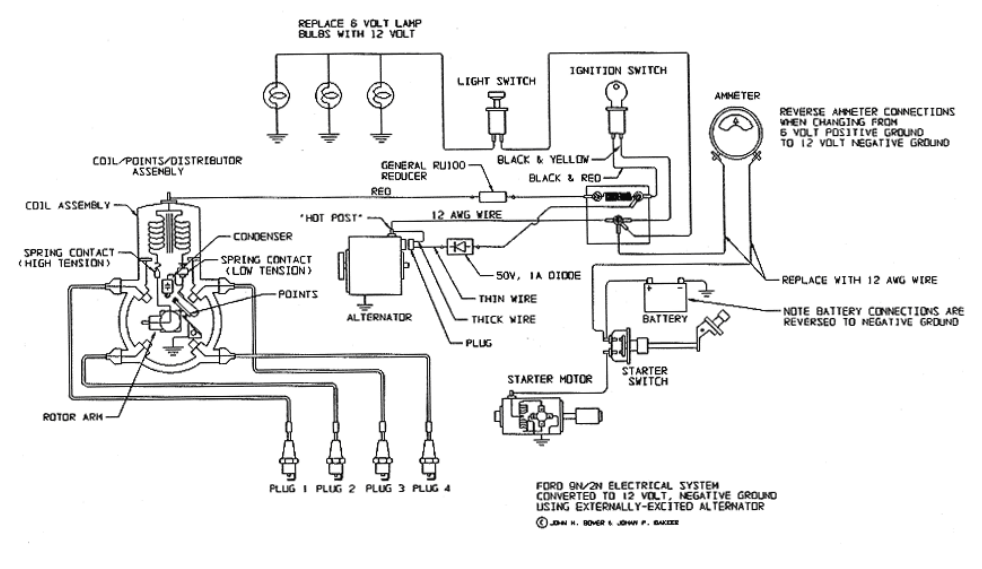
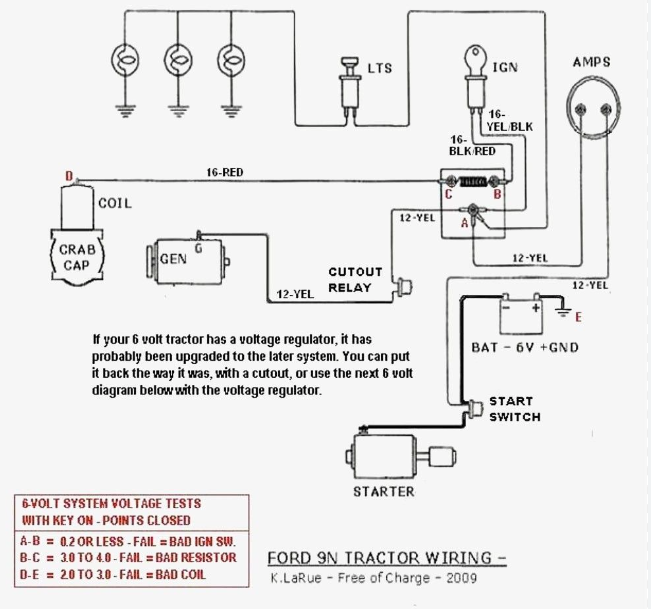
The transformation from a 6-volt to a 12-volt system involves replacing the generator with a 12-volt alternator. Whether your tractor comes with a complete conversion kit or you’re making the shift using individual components, the process can be simplified by familiarizing yourself with the wiring diagram.
2. Safety Measures
Before embarking on the conversion, disconnect and remove the battery. This is a crucial step to ensure safety when working with electrical systems. Caution is necessary to avoid short circuits, which could lead to fire hazards.
3. Analyzing the Wiring Diagram
At first glance, the wiring diagram for a 6-volt to 12-volt conversion may seem complex. However, simplifying the chart makes the task manageable. The first step is to eliminate the wire running to the “F” on the generator, which is unnecessary in the new system, as a 12-volt alternator has its internal regulator.
4. Implementing the Conversion
The conversion involves removing specific components from the wiring diagram, such as the generator and cutout, and replacing them with an alternator. The wire going to the ammeter now comes from the alternator. Swapping the connections on the ammeter to align with the 12-volt system’s negative ground is essential. If not, the ammeter will display discharge when charging and vice versa.
To ensure safety, introduce a fuse between the alternator and the ammeter. The alternator can produce over 60 amps, which could overload the ammeter. A modern spade fuse loop with a #10 wire can be used for this purpose. This fuse will limit the alternator’s output and protect your ammeter.
Lastly, the battery requires attention during the conversion. A 12-volt battery that fits the case is needed. Furthermore, the poles must be swapped, with the minus going to the ground and the plus connecting to the solenoid or starter switch.
5. Caring for Your New 12 Volt System
Upon successful conversion to a 12-volt system, proper maintenance is paramount. Regularly inspect the connections and replace any worn-out or damaged components. Regular upkeep enhances the safety and longevity of your system.
Conclusion
The conversion from a 6-volt system to a 12-volt system in a tractor is less complicated. You can complete the conversion process by understanding the wiring diagram and taking appropriate safety measures. This guide provides a detailed, step-by-step approach to help you efficiently and safely perform this task.
Remember, if you’re ever unsure about any part of the process, it’s safer to seek help from a professional. When dealing with electrical systems, it’s always better to err on the side of caution.

